Licensing Microsoft Entra administrator accounts for email is a common practice, but it introduces avoidable security risks. Privileged accounts should remain isolated from unnecessary communication channels to minimize vulnerabilities.
This guide shows how to set up email notifications for admin accounts without assigning them a mailbox license. We’ll also include visual steps for enabling plus addressing, setting up forwarding rules, and verifying the addressing format in mail headers.
Why Avoid Licensing Admin Accounts?
Assigning a mailbox license to admin accounts increases their exposure to potential attacks:
- Higher Risk of Phishing and Social Engineering: Licenses tie email accounts to critical admin privileges, making them prime targets.
- Cost Inefficiency: Extra licenses for admin accounts add unnecessary expenses ,and are also overlicensing with thoughts on the “One human one license” policy from Microsoft.
By using plus addressing and forwarding rules, you can manage notifications securely while protecting your accounts.
Dont miss Critical Notifications Sent to Tenant Admins
Another argument to use plus addressing is that without proper configuration to route notifications to a monitored mailbox, tenant admins risk missing critical updates and alerts.
Here are some examples of notifications typically sent to tenant administrators:
Security alerts
Service health uodates
Compliance notes
Billing updates
Administrative taks reminders
Threath management updates
User management alerts
Step 1: Enable Plus Addressing in Exchange Online
To route admin notifications to your personal email address securely, you’ll leverage plus addressing. This method allows you to create a unique forwarding email address for admin notifications. Here’s how it works:
Let’s say your personal email address is user@domain.com, and you want admin-related notifications sent to your mailbox. By using plus addressing, you can assign a custom variation of your email address, such as user+adminnotifications@domain.com, and configure it to receive messages originally intended for the admin account.
How to Enable Plus Addressing
To ensure plus addressing is active in your tenant:
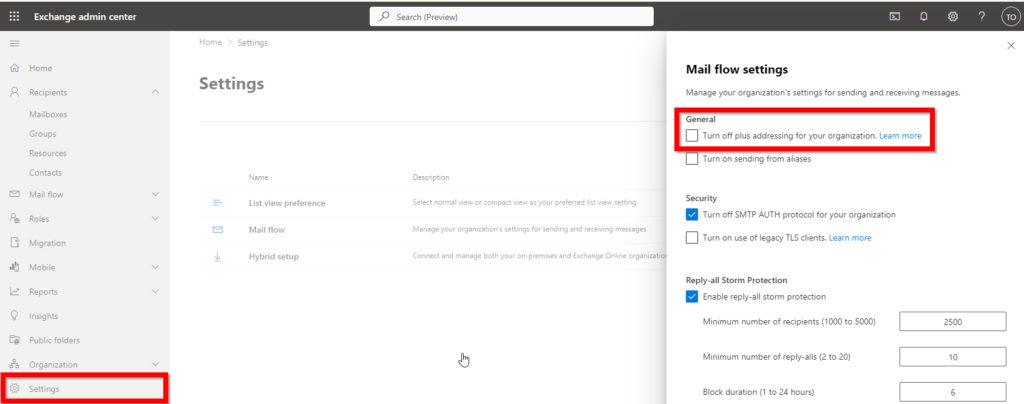
- Log in to the Exchange Admin Center.
- Navigate to Settings > Mail Flow.
- Confirm that plus addressing is turned on by ensuring the checkbox for “Turn off plus addressing for your organization” is not selected.

Step 2: Configure Plus Address for Admin Notifications
To forward admin notifications securely to your personal email address (e.g., user@domain.com), you will assign a plus address variation as the admin account’s contact email. This ensures all notifications sent to the admin account are routed to your mailbox using the plus addressing feature.
Here’s how to set it up:
Update Contact Information in Microsoft Entra Admin Center
- Log in to Microsoft Entra Admin Center.
- Navigate to Identity > Users > All Users.
- Select the admin account you want to configure.
- Under Properties, click Edit Contact Information.
- In the Email Contact field, enter your custom plus address, such as
user+adminnotifications@domain.com. - Click Save.
Using PowerShell to Configure the Plus Address
If you prefer using PowerShell, follow these steps:
- Connect to Microsoft Graph:
Connect-MgGraph -Scope User.ReadWrite.All
2. Update the admin account’s contact email:
Update-MgUser -Userid admin@yourdomain.com -Mail user+adminnotifications@domain.com
Once done, your admin account will display the new plus address.
Step 3: Set Up a Forwarding Rule for Notifications
After configuring the plus address for the admin account, you need to create a forwarding rule in your personal mailbox (e.g., user@domain.com) to ensure that notifications sent to the plus address are delivered to a specific folder for easy management.
Create a Forwarding Rule in Your Mailbox
- Log in to your email account (e.g.,
user@domain.com) using Outlook on the web or your preferred email client. - Navigate to the Settings menu and select View all Outlook settings.
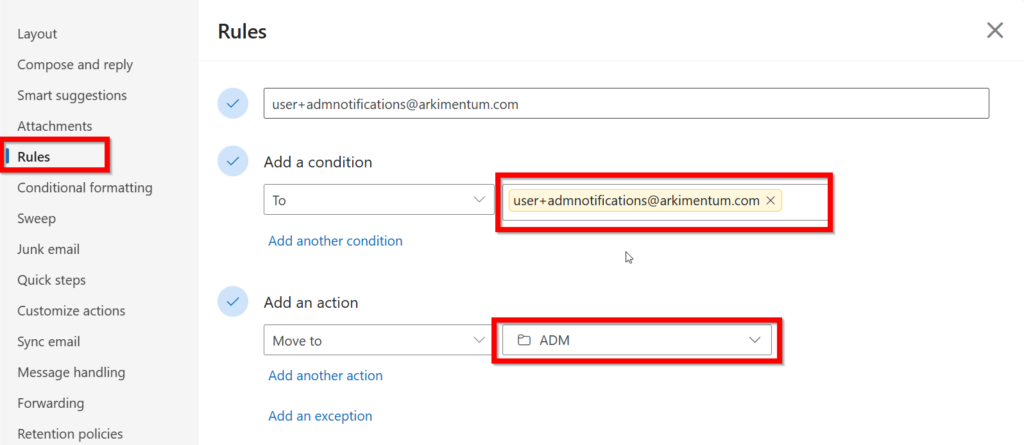
- Go to Mail > Rules, then click Add new rule.
- Configure the rule as follows:
- Name the Rule: Enter a descriptive name, such as “Admin Notifications.”
- Condition: Select To and enter your plus address (e.g.,
user+adminnotifications@domain.com). - Action: Select Move to and choose or create a folder to organize these notifications (e.g., “Admin Alerts”).
- Save the rule.

Verify the Rule
Send a test email to the plus address (user+adminnotifications@domain.com) from another account. Check that the email is automatically forwarded to your specified folder.
Step 4: Usage
Testing the Plus Address
To test your setup:
- Open Outlook (web or desktop client).
- Compose a new email and address it to your plus address (e.g.,
user+adminnotifications@domain.com). - Add a subject line and body text, then send the email.

Verify Delivery
- Check your inbox or the folder specified in the forwarding rule.
- Confirm the test email appears correctly and is routed as configured.
This process ensures that admin notifications sent to your plus address are successfully forwarded to your mailbox, allowing you to monitor and manage them effectively.
Conclusion
Using plus addressing and forwarding rules offers a secure and cost-effective way to handle admin notifications without assigning a mailbox license.
By following this approach, organizations can:
- Maintain the security of privileged admin accounts.
- Eliminate unnecessary licensing costs.
- Ensure notifications are delivered reliably.
Use the included steps and visuals to safeguard your admin accounts while keeping critical communications intact.


